LILYGO T7 S3
ESP32-S3 development board with 16 MB flash, 8 MB PSRAM, Bluetooth 5.0, and STEMMA QT/Qwiic connector, compatible with Arduino IDE and MicroPython for versatile IoT prototyping.
$7.93
Hardware Specifications
Connectivity
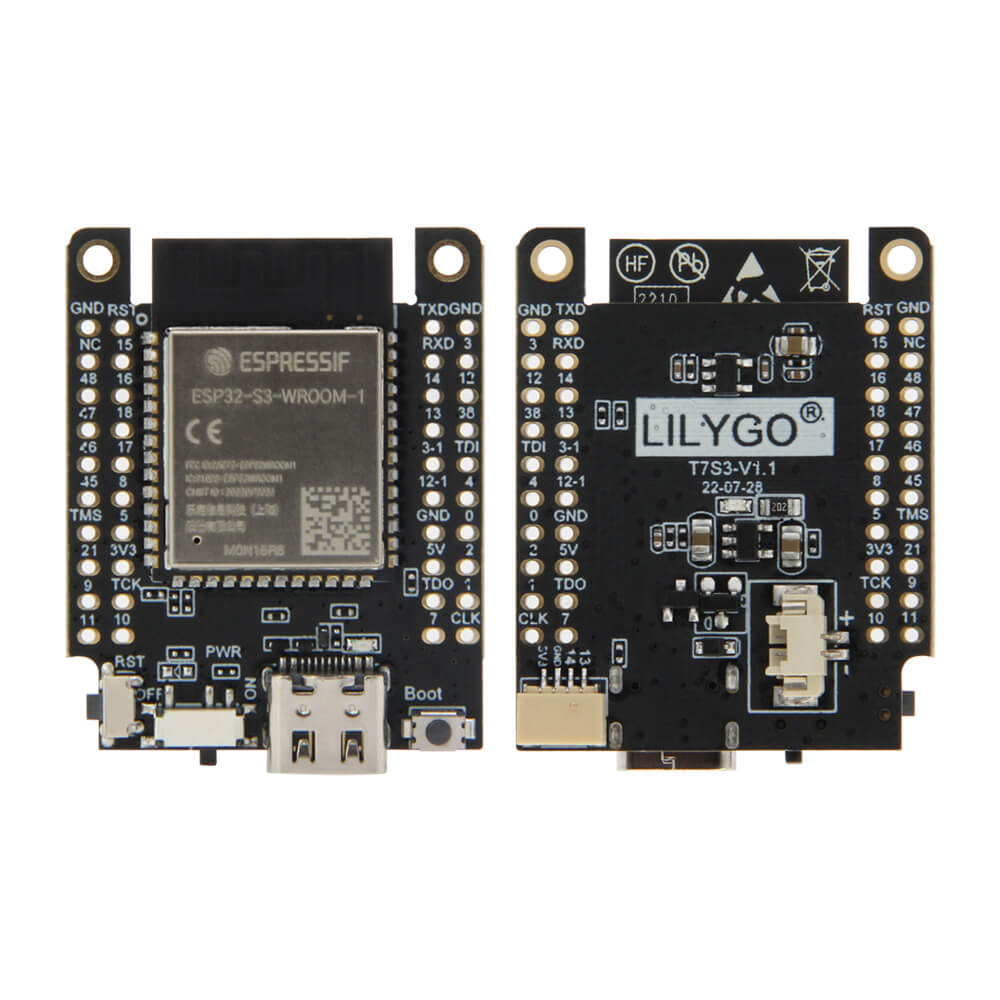
Components
Dual-core Xtensa LX7 at 240 MHz with 16 MB flash, 8 MB PSRAM, Wi-Fi, Bluetooth 5.0
Resources
Where to Buy
Overview
The LILYGO T7 S3 is a capable ESP32-S3 development board built around the ESP32-S3-WROOM-1 module, offering 16 MB of flash and 8 MB of PSRAM — significantly more memory than typical ESP32 boards. This makes it well suited for image processing, machine learning inference, and complex firmware that benefits from ample storage and RAM.
Bluetooth 5.0 with Bluetooth Mesh support expands its connectivity options beyond classic Bluetooth 4.2, enabling larger mesh network deployments. A STEMMA QT / Qwiic JST-SH 1.0mm connector allows plug-and-play connection to the large ecosystem of I2C sensors and peripherals from Adafruit, SparkFun, and others without soldering.
The board ships with male pins and long/short female pin headers, as well as a JST 1.25mm 2P connector. Programming is via native USB 3.0. It supports C/C++ development with Arduino IDE or VS Code + ESP-IDF, as well as MicroPython.
Firmware Compatibility
The T7 S3 works with the Arduino IDE using the ESP32 Arduino core v2.x or later. The large flash and PSRAM make it compatible with TensorFlow Lite for Microcontrollers, LVGL, and other memory-intensive frameworks. MicroPython and CircuitPython images for ESP32-S3 are also compatible. LILYGO's GitHub provides board support files and example code.
Flashing Guide
- Connect via USB Type-C (USB 3.0).
- In Arduino IDE, select "ESP32S3 Dev Module."
- Set Flash Size to 16 MB and PSRAM to "OPI PSRAM."
- Select the correct COM port (USB CDC On Boot: Enabled for serial output).
- Open an example sketch and click Upload.
- If needed, hold BOOT and press RESET to enter download mode manually.
Related Products
ESP32-S3This product page may contain errors. If you find any, please report them.